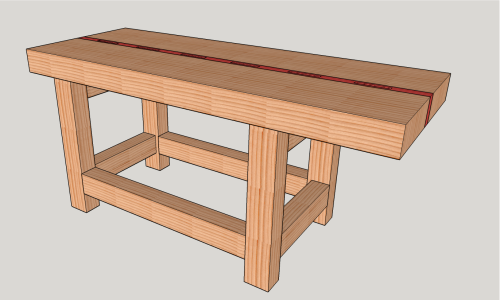
I am building a new Woodworking bench for my shop. I decided on a split top Roubo bench. I want something really heavy and with a really thick stable table top. But I don't have thousands of dollars to spend on a professional woodworking bench. So I designed this.

I created a project where I can have the same thing for less than a couple hundred dollars. I purchased my lumber at my local big box store.

I chose Douglas Fir but virtually any dimensional lumber will work including things like Southern yellow Pine. I bought only 2x6's to make the materials list easy. And this way I will have a really thick table top which after all planing, jointing, and sanding will still be 5 inches thick. I am also going to carry the very stout look all the way through the build. I've decided to include a lower shelf and make that out of 2x material as well. I think this will make for a bench that is about 400 to 500 pounds in weight. And it will be virtually indestructible.
One of the most important things when selecting the lumber is to try to pick up the straightest material that you can find. This is what I did, and I also picked lumber that was knot-free on at least one edge. This will allow me to have a benchtop that doesn't have knots on it. This takes quite a while to sort through the boards but you only have to do it once and it's worth the effort. Especially when you consider that you might be saving thousands of dollars in the process.

Now that I got the boards back to my shop, the first thing I did was to cross cut the pieces to the correct lengths with a few extra inches on each board. Then I ran them all through my jointer and planer in the right order to ensure parallel sides. Next I glued up all the top boards. The top will be built into two sections. It really helps to have an extra hand or two in the shop while you are doing this glue-up. Make sure to use plenty of clamps on both sides of the project. And then it's best to let it dry overnight. After drying you can take off the clamps and use a paint scraper and scrape the excess glue squeeze out away from both sides. When that's done, I took each block back to the planer, and got both sides flat and parallel.

This could also be done with a hand plane. And I have at least one friend who would have done it faster by hand than me, carrying it over to the jointer for multiple passes. By the way, this is an excellent opportunity to develop some hand plane skills!! It's shop furniture, and if you mess up a little, you can just take off a little more and still have plenty of thickness. AND, if you've never planed before that's ok too! Just hand plane the bottom! It'll never be seen if it's less than perfect. Then the tops took a trip back to the jointer to perfect the sides and get rid of the clamp marks. Last step in milling the tops is to crosscut them to exact length. And I'll do that next.
Stay tuned...
How to make a Split-Top Roubo Woodworking Bench for Under $200
Comment (1)
Muchas gracias. ?Como puedo iniciar sesion?